Start by collecting 5–10 pieces, trace each on kraft paper, tape the paper templates to your wall, and rearrange until you love the layout. Then hang the largest piece first. That’s the secret professionals use.
I’ve hung gallery walls for design firms, cafes, and my own messy living room. The biggest mistake people make? Hammering nails before testing the layout. Don’t do that. This guide walks you through the exact process—no expensive tools, no regrets, and no extra holes in your wall. If you’re creating a wall gallery for the first time, you’re in the right place.
Forget the “”Rules”—Your Wall, Your Story
There are no real rules. Seriously.
A gallery wall is a collection of pieces that mean something to you. Canvas prints, family photos, mirrors, textiles, and even a child’s first shoe framed. The best gallery walls feel personal, not like a museum exhibit.
What matters is that you enjoy the process. And that the final result doesn’t look like a chaotic mess. That’s where a little planning helps.
Real example: A client once wanted to hang 20 pieces of mismatched art above her sofa. She was stressed. We traced everything on kraft paper, moved the templates around for 20 minutes, and found a layout that worked. No nails wasted. She still texts me photos of that wall two years later.
How to Display Pictures on Wall: Start with What You Love
Before you pick up a hammer, gather everything you might want to hang. Canvas prints, framed photos, mirrors, small shelves, even your child’s first drawing.
Pro tip: Lay everything on the floor. Move pieces around. See what speaks to you. This is the fun part—no commitment yet.
If you’re after cheap gallery wall ideas, thrift frames, print your own photos on budget canvas, and mix in free objects like postcards or dried plants. A gallery wall doesn’t need expensive art. It needs a heart.
Mix Canvas Prints with Other Objects for Depth
Canvas prints are fantastic because they’re lightweight, have no glare, and feel like art. But a gallery wall shines when you mix mediums.
What to combine:
- Stretched canvas prints (large and small)
- Framed photos or posters
- Mirrors (printed or plain)
- Small shelves with plants or objects
- Textiles like woven wall hangings
- Plates, acrylic disks, or printed tiles
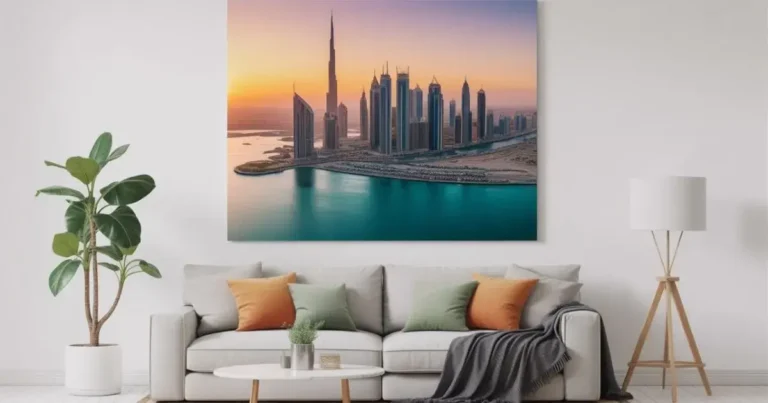
The mix of textures—soft canvas, shiny glass, and natural wood—creates visual interest. Just keep a common thread. That could be frame color, subject matter, or a color palette. Start your gallery wall with high-quality pieces from our canvas printing services, available in custom sizes and finishes.
Two Layout Strategies: Symmetrical vs. Free‑Flow
Pick your vibe before you pick up a hammer.
Symmetrical (structured):
Measure everything. Equal spacing. Same size frames or a clear grid. Works well in hallways, above a console table, or in a home office where you want calm. For long, narrow walls, explore panoramic canvas wall art styles that fit perfectly above sofas or in hallways.
Free‑flow (organic):
Arrange pieces by feel, not math. Start with a large anchor piece, then cluster smaller ones around it. Great for living rooms, staircases, or bohemian bedrooms.
Not sure which? Try the free‑flow approach first. It’s more forgiving and feels more personal.
Step‑by‑Step Hanging Guide (No Extra Holes)
Gather these first: your artworks, kraft paper, scissors, painter’s tape, pencil, hammer, nails or picture hangers, measuring tape, and a level.
Step 1: Collect all your pieces
Pull together everything you want on the wall. Canvas prints, framed art, mirrors, even small objects you plan to hang. Place them on the floor so you can see the whole collection.
Step 2: Trace and cut kraft paper templates
This is the most important step.
Lay each piece face down on kraft paper. Trace around it. Cut out the shape. On each paper template, mark where the hanging hook or nail should go.
Now you have a set of paper stand‑ins for your art. Avoid lifting heavy frames multiple times.
No art wall visualizer app? No problem. Kraft paper templates are the original low‑tech visualizer—and they work better than any app.
Step 3: Tape templates to the wall
Use painter’s tape to stick the paper templates on your wall. Move them around. Stand back. Live with the layout for an hour or even a day. Rearrange until it feels right.
Pro tip: Start with the largest piece at eye level (about 57–60 inches from the floor to the center). Then build around it.
A studio diy gallery wall is easier than it looks. The secret is exactly this: test the layout on the floor and wall before nailing anything.
Step 4: Keep spacing consistent (or don’t)
For a clean look, keep 2–3 inches between frames. Use a ruler or measuring tape.
For a relaxed look, eyeball it. Just avoid huge gaps or pieces that touch.
A good rule: larger pieces can have more breathing room. Smaller pieces look better clustered a bit tighter.
Step 5: Balance, not symmetry
Don’t put all the dark, heavy pieces on one side. Spread visual weight around. Mix a large canvas with two small frames nearby. Place a bright piece opposite a muted one.
Think of it like a seesaw. Your eye should travel easily across the whole wall.
Step 6: Hammer nails through the paper
Once you love the layout, hammer a nail through the mark you made on each paper template. Remove the paper and tape. Now your nail holes are exactly where they need to be.
Step 7: Hang your pieces (start with the largest)
Hang the biggest canvas or frame first. Check its level. Then add the next largest, and so on. Finish with the smallest accent pieces.
Step back every few pieces. Adjust if something feels off.
“Kraft paper templates are the difference between a gallery wall you love and a wall full of regret holes. I’ve never hung a nail without them.”
“A great gallery wall doesn’t need expensive art. It needs a fantastic layout. Mix a budget canvas print with a family photo and a found object—suddenly it’s priceless.”
Gallery Wall Color Schemes That Work
Color ties everything together. Here are three foolproof approaches.
White to bright: Use a white or neutral wall as your backdrop. Then let colorful canvas prints pop. This works in almost any room.
Neutral luxe: Stick to black, white, beige, and soft gray tones. Different textures (canvas, wood, mirror) add interest without color chaos. Perfect for hallways or small spaces.
Matchy‑matchy: Pick one color from your artwork (like a blue from a landscape print) and repeat it in other pieces, cushions, or decor. Creates a curated, intentional look.
Using Mirrors as Wall Art (A Small‑Room Hack)
- Mirrors reflect light and make a room feel twice as big. Hang one large mirror as a statement piece, or group several small mirrors with your canvas prints.
- You can even print art directly onto mirrors. That’s a conversation starter.
How to Handle a Floor‑to‑Ceiling Gallery Wall
Feeling bold? Cover an entire wall from baseboard to crown molding.
Start on a smaller wall first—a staircase or entry hallway. Use a mix of very large and very small pieces. Keep the spacing tight (1–2 inches) so it reads as one giant installation. And definitely use kraft paper templates for this one. Trust me.
Bedroom Picture Wall Ideas (Quiet & Personal)
- Your bedroom should feel calm. Here’s how to nail a gallery wall there.
- Above the headboard: Keep it balanced. One large canvas centered, or three pieces in a row with equal spacing. Soft colors only. For living room focal points, see our ideas for large canvas wall art for living room that anchor any gallery wall.
- Above a dresser: Go asymmetrical. One large piece on one side, then two or three smaller pieces clustered on the other side.
- Small bedroom hack: Use mirrors mixed with small canvas prints. The mirrors bounce light and make the room feel bigger.
Common Gallery Wall Mistakes to Avoid
- Skipping the paper template step. You will nail into the wrong spot. I promise.
- Hanging everything at the same height. Vary it. That’s what “gallery” means.
- Ignoring wall color. White walls can handle anything. Dark walls need lighter art to stand out.
- Forgetting about lighting. A gallery wall without a spotlight or good ambient light looks flat. Add a picture light or aim a track light at it.
Still Planning Your Wall? Try These Related Ideas
- Creating a wall gallery from scratch? Start with our kraft paper method above.
- Need cheap gallery wall ideas? Mix printed canvas with DIY frames and free objects.
- Want to visualize before hammering? Use an art wall visualizer app or stick with paper templates.
- Looking for bedroom picture wall ideas? Keep it soft and low above the headboard.
- Trying a studio diy gallery wall? Test layouts on the floor first—it’s surprisingly fun.
Conclusion
Creating a gallery wall with canvas prints is one of the most satisfying home projects you can do. It’s affordable, personal, and impossible to mess up if you plan first. Trace your pieces on kraft paper. Tape them up. Move them around. Then hang with confidence. Your wall will tell your story—and you’ll smile every time you walk past it.
FAQ
How many pieces do I need for a gallery wall?
Anywhere from 3 to 30. Start with 5–9 for a manageable first project.
What’s the ideal spacing between frames on a gallery wall?
2–3 inches for a clean look. 1–2 inches for a dense, maximalist style. Larger pieces can have 4 inches around them.
Can I mix canvas prints with framed photos?
Absolutely. Canvas adds texture. Framed photos add crispness. Just keep frame colors similar for unity.
How high should I hang the center of my gallery wall?
Eye level is around 57–60 inches from the floor. If hanging above a sofa or bed, leave 6–12 inches between the furniture and the bottom of the lowest piece.
Do I need special hooks for heavy canvas prints?
Most stretched canvas prints are lightweight. Use a simple nail or picture hook. For very large canvases (over 24″), use a wall anchor or a French cleat.
What if I change my mind after hanging everything?
Patch small nail holes with spackle. Paint over them. Then rearrange. That’s why kraft paper templates are worth the extra 20 minutes.
What are good cheap gallery wall ideas for renters?
Use command strips instead of nails. Print photos on budget paper and clip them to string. Lean canvases on a shelf. No wall damage, all style.
